Lighting is the jewelry of your home. It can completely transform a cold, boring room into a warm, inviting sanctuary. Whether you have bought a chic industrial pendant for your dining room or a bohemian rattan fixture for the bedroom, the excitement of buying a new light is often followed by a moment of panic: How on earth do I put this thing up?
If you are staring at a box of wires and brackets, feeling a little overwhelmed, take a deep breath. You are not alone. Many homeowners are intimidated by electrical work, but swapping out a light fixture is actually one of the most manageable DIY projects you can tackle.
In this guide, we will walk you through exactly how to hang a hanging lamp. We will strip away the complicated jargon and focus on simple steps to get your new light up safely and securely.
Safety First: The Golden Rule
Before we even touch a screwdriver, we need to talk about safety. Electricity is nothing to mess around with. When learning how to hang a hanging lamp, the most critical step happens before you climb the ladder.
Turn off the power.
Do not just flip the wall switch. Go to your home’s main circuit breaker panel, find the switch that controls the room you are working in, and flip it off. If you aren’t sure which one it is, turn off the main power to the house just to be safe. It is always better to reset a few clocks than to get a shock!
Pro Tip: Use a non-contact voltage tester (a cheap tool available at any hardware store). You just touch it to the wires, and it beeps if power is still flowing. It’s a lifesaver—literally.
Gather Your Tools
You don’t need a professional electrician’s tool belt, but having the right items handy will make the process smooth. Here is your checklist:
- A sturdy ladder: Don’t stand on a wobbly chair.
- Voltage tester: To ensure the power is truly off.
- Screwdrivers: Both flathead and Phillips head.
- Wire strippers: In case you need to expose more copper wire.
- Electrical tape: For extra security.
- Wire nuts: Usually included with your new lamp, but good to have extras.
- A helping hand: Hanging a lamp is much easier with a buddy to hold the fixture while you wire it.
Step-by-Step: How to Hang a Hanging Lamp
Now that you are prepped and safe, let’s get into the actual installation. We are assuming you are replacing an existing light fixture with a new hardwired pendant or chandelier.
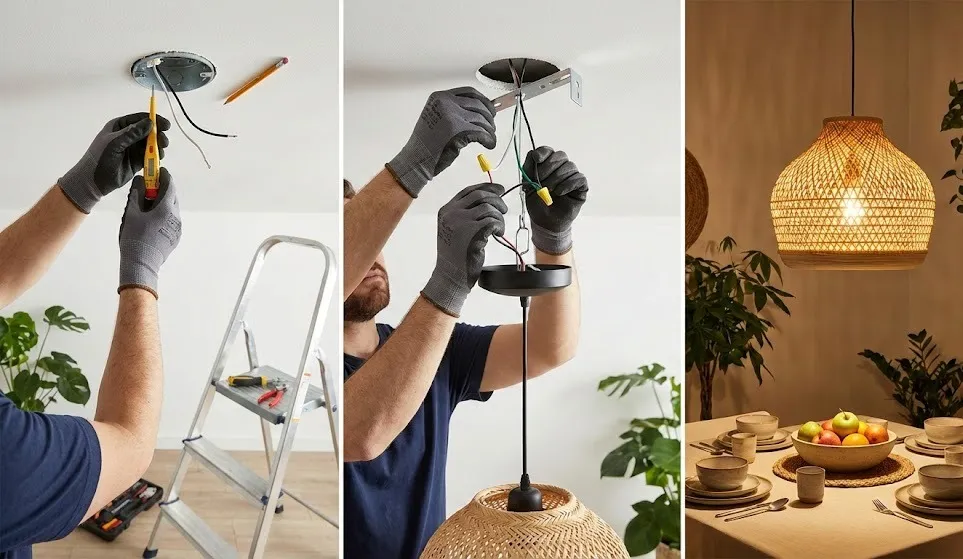
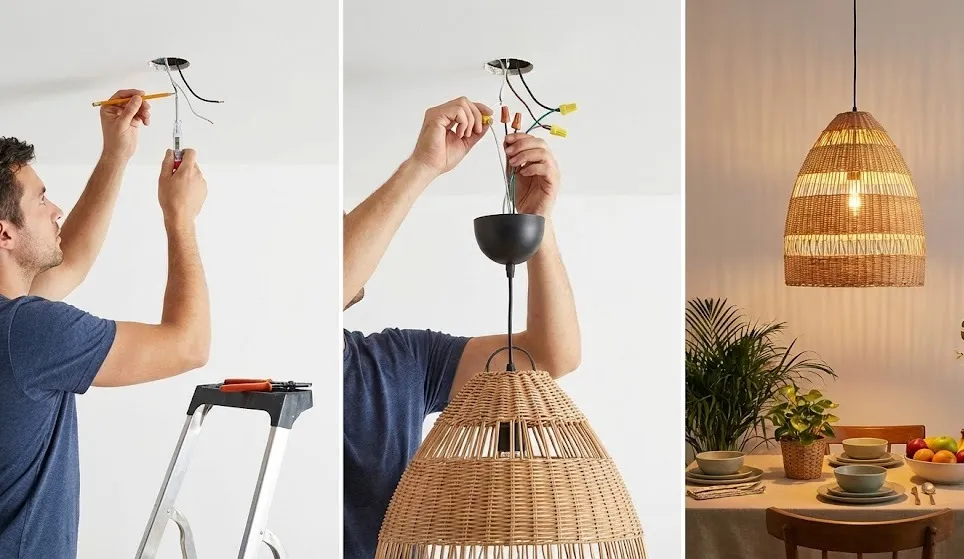
1. Remove the Old Fixture
Once the power is off, unscrew the canopy (the decorative plate against the ceiling) of the old light. You will see a few wires connecting the fixture to the ceiling box. Unscrew the plastic wire nuts connecting them and gently separate the wires. Remove the old mounting bracket if your new lamp requires a different style.
2. Install the New Bracket
Your new lamp likely came with a mounting bracket or a strap. This is the metal piece that screws directly into the junction box in your ceiling. Screw this bracket in tightly. This is the foundation that will hold the weight of your lamp, so make sure it is secure.
3. Adjust the Height
Before you wire it up, figure out how low you want the lamp to hang.
- Over a dining table: The bottom of the light should be 30 to 36 inches above the table surface.
- In a hallway or living room: Ensure there is at least 7 feet of clearance from the floor so no one bumps their head.
Adjust the cord or chain length on your new fixture accordingly. You may need to cut excess wire, but always leave yourself about 6 inches of extra wire to work with.
4. Connect the Wires (The “Scary” Part)
This is the part that stresses people out, but it is actually just a matching game. When figuring out how to hang a hanging lamp, you just need to match color to color:
- Black to Black: This is usually the “hot” wire that carries the current.
- White to White: This is the “neutral” wire.
- Green/Copper to Green/Copper: This is the “ground” wire.
Note: If your new lamp has a clear cord instead of colored wires, the smooth side is usually the hot wire (black) and the ribbed side is the neutral (white). Check your manual to be sure!
Twist the exposed metal ends of the matching wires together, then screw a plastic wire nut over them (clockwise) until it is tight. Give them a gentle tug to make sure they are holding firm. For peace of mind, you can wrap a bit of electrical tape around the base of the wire nut and the wires.
5. Ground the Fixture
Never skip the ground wire! Wrap the copper or green wire from your fixture around the green screw on your mounting bracket, or connect it to the copper wire coming from your ceiling. This protects you from electrical surges.
6. Tuck and Secure
Gently fold the connected wires back into the electrical box in the ceiling. Be careful not to pinch them. Slide the canopy up the chain or cord until it is flush against the ceiling. Screw it into place using the provided decorative nuts or screws.
7. Power Up!
Screw in a light bulb, hop off the ladder, and go flip the breaker back on. Flip your wall switch. If the light turns on, congratulations! You just learned how to hang a hanging lamp all by yourself.
What If There Is No Ceiling Box? (The Swag Method)
Sometimes, you want a hanging lamp in a corner where there is no electrical box in the ceiling. In this case, you don’t need to do any wiring. You need a “Swag Lamp.”
A swag lamp is a hanging lamp with a long cord that plugs into a wall outlet. Here is how to handle those:
- Install a Ceiling Hook: Find a ceiling joist (stud) using a stud finder. Screw a heavy-duty swag hook into it. If you can’t find a stud where you want the light, use a toggle bolt anchor—these expand inside the ceiling to hold weight.
- Install a Second Hook: Place a second hook near the corner of the wall where the cord will drop down to the outlet.
- Drape the Cord: Hang the lamp on the main hook, drape the cord to the corner hook, and plug it in.
This is a fantastic option for renters who cannot mess with electrical wiring but still want the elegance of a hanging pendant.
Common Mistakes to Avoid
Even seasoned DIYers make slips. Here are a few things to watch out for:
- Over-tightening bulbs: Screw them in until they stop, but don’t force them. You can break the socket.
- Ignoring weight limits: If you bought a heavy crystal chandelier, a standard plastic electrical box might not hold it. You may need to install a heavy-duty fan brace box in the ceiling first.
- Reversing polarity: Crossing the black and white wires can technically make the light work, but it creates a shock hazard. Always stick to the color matching!
Final Thoughts: Let Your Light Shine
Updating your lighting is one of the highest-impact changes you can make to your home decor. It changes the mood, highlights your furniture, and makes the space feel finished.
Now that you understand how to hang a hanging lamp, you don’t have to wait for an electrician or a handy relative to stop by. You have the knowledge to take control of your space. So, go pick out that statement piece you’ve been eyeing, grab your ladder, and brighten up your world.