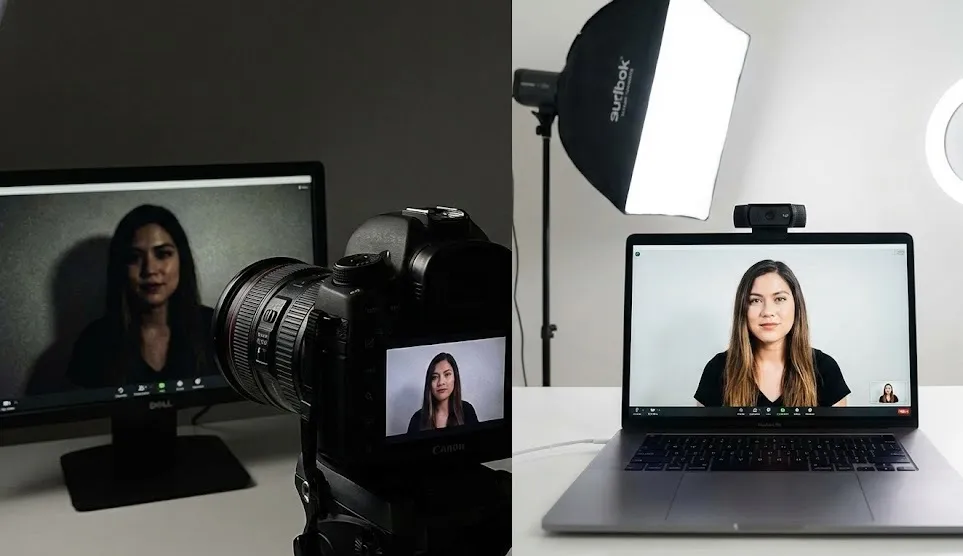
We have all been there. You log into an important Zoom call or Google Meet, turn on your camera, and suddenly realize you look like a character from a shadowy mystery movie. Or worse, you look tired, washed out, or pixelated.
In the age of remote work, your webcam is your handshake. It is how you make a first impression, how you connect with colleagues, and how you maintain professionalism. While having a high-quality camera helps, even the most expensive 4K webcam looks terrible in the dark. The secret sauce isn’t more pixels; it is better light.
Finding the best lighting for webcam meetings doesn’t require a Hollywood budget or a film degree. It just takes a little knowledge about positioning and the right tools. Whether you are presenting to a client or checking in with your team, this guide will help you light up your home office effectively.
Why Lighting Matters More Than Your Camera
You might wonder why you need to worry about lights if you already bought a decent webcam. Here is the simple truth: cameras crave light.
Webcam sensors are tiny. When there isn’t enough light in the room, the camera has to work overtime to artificially brighten the image. This results in “noise” or graininess that fuzziness that makes your video look low-quality.
Proper lighting does three things for you instantly:
- It eliminates shadows that can make you look tired or hide your facial expressions.
- It improves video fidelity, making the image crisp and clear.
- It communicates professionalism, showing you care about how you present yourself.
To achieve the best lighting for webcam meetings, you need to control where the light comes from and how soft it is.
The Golden Rule: Face the Light
Before we talk about buying gear, let’s talk about physics. The number one mistake people make is sitting with a window behind them. This is called “backlighting.”
When a bright window is behind you, your camera exposes for the bright light outside, turning you into a dark silhouette. To fix this instantly, rotate your desk. Always face the window. Natural daylight is often the best lighting for webcam meetings because it is soft, diffused, and free.
However, relying solely on a window has a downside: clouds. If the sun goes behind a cloud, your lighting changes instantly. For consistency, you will eventually want artificial light.
Types of Artificial Lighting for Video Calls
If you are ready to upgrade from “sitting near a window” to a consistent, professional setup, here are the main contenders.
1. Ring Lights: The Influencer Favorite
Ring lights are popular for a reason. They are circular lights that you place directly in front of you, usually with your camera in the center.
- Why they work: They blast light evenly onto your face, removing almost all shadows.
- The downside: If you wear glasses, ring lights can be annoying because they reflect a distinct white circle in your lenses.
- Best for: Quick, easy setups where space is limited.
2. LED Panel Lights (Key Lights)
These are rectangular panels that provide a wash of soft light. Many professionals consider panels the best lighting for webcam meetings because they are versatile.
- Why they work: They are often softer than ring lights and can be placed off to the side to create more depth (3D look) on your face rather than a flat look.
- Best for: Dedicated home offices where you can mount lights on a desk or stand.
3. Monitor Light Bars
These sit on top of your monitor and shine down onto your desk.
- Why they work: While primarily designed to light up your workspace and reduce eye strain, some newer models have a front-facing light designed for webcams.
- Best for: Minimalists who hate cluttered desks.
Understanding Color Temperature
Have you ever bought a light bulb that looked “too yellow” or “too blue”? That is color temperature, measured in Kelvins (K).
- Warm Light (2700K – 3000K): Cozy, yellow/orange. Good for relaxing, but can make you look like you are sitting by a campfire during a meeting.
- Daylight (5000K – 6000K): Bright, white/blue. This matches the sun at noon.
For video calls, adjustable temperature is key. You generally want a “Daylight” setting (around 5600K) to look awake and alert. However, if your room has warm overhead lamps, you might want to adjust your webcam light to match them so you don’t look blue while the room looks orange.
How to Set Up Your Lighting (The 3-Point Setup)
You don’t need three lights, but understanding this concept helps you utilize even a single lamp better. This is the standard technique photographers use to get the best lighting for webcam meetings.
1. The Key Light
This is your main source of light. Place it behind your webcam, slightly above eye level, and angled down at your face at about 45 degrees. If you have only one light, make it this one.
2. The Fill Light
The Key Light might create shadows on one side of your nose or cheek. A “Fill Light” goes on the opposite side to soften those shadows. This light should be dimmer than your Key Light. You can often use a window or a simple desk lamp for this.
3. The Back Light (Rim Light)
This is the “pro” move. This light sits behind you and shines on your hair or shoulders. It separates you from the background, giving the image depth so you don’t look like a cardboard cutout.
DIY Hacks for Better Lighting on a Budget
You don’t have to spend a fortune. Here is how to hack your way to the best lighting for webcam meetings using stuff you already own:
- The Wall Bounce: If you have a harsh desk lamp, don’t point it at your face. Point it at the white wall behind your computer. The light will bounce off the wall and hit your face as a soft, diffused glow.
- Use Your Monitor: If you are in a pinch, open a blank white Word document on your screen and turn the brightness up to 100%. Your monitor effectively becomes a giant soft light box.
- Paper Diffusion: If your lamp is too bright and harsh, tape a piece of white parchment paper or a thin white t-shirt over it (be careful with heat!). This softens the light significantly.
Common Mistakes to Avoid
Even with good gear, you can mess up your shot. Avoid these pitfalls:
- Overhead Lighting: The “ceiling fan light” is the enemy. It casts dark shadows under your eyes (raccoon eyes) and nose. Always turn off the overhead light and use desk-level lighting instead.
- Mixing Colors: Don’t have a blue window open on your left and a yellow lamp on your right. It confuses the camera’s white balance. Close the blinds or match your bulb to the daylight.
- Too Much Brightness: Brighter isn’t always better. If your face looks like a glowing white ghost, dim your lights. You want to look natural, not nuclear.
Conclusion
Looking great on video isn’t about vanity; it’s about removing barriers to communication. When people can see your eyes and your expressions clearly, they trust you more.
Start by facing a window. If that isn’t an option, invest in a simple LED panel or ring light. Remember to position it slightly above eye level and diffuse the light whenever possible. By following these simple steps, you will easily achieve the best lighting for webcam meetings and stand out as a professional in a sea of dark, grainy video tiles.
Your next meeting is your time to shine, literally!