Have you ever settled into bed, pulled up the covers, and then realized you left the kitchen light on? We’ve all been there. It’s that moment of dread where you have to decide: do I get up and freeze, or do I just sleep with the light on?
This is exactly why smart home technology is a game-changer. Upgrading your standard wall switches to smart switches gives you the power to control your lighting with your voice, your phone, or even a schedule. It feels like magic, but it’s actually just simple wiring.
If the thought of messing with electricity scares you, take a deep breath. You don’t need to be a professional electrician to figure out how to install a smart light switch. With the right precautions and a little patience, you can modernize your home in under an hour.
In this guide, we will walk you through the process step-by-step, using simple language and practical tips to keep you safe.
Before You Buy: The “Neutral Wire” Check
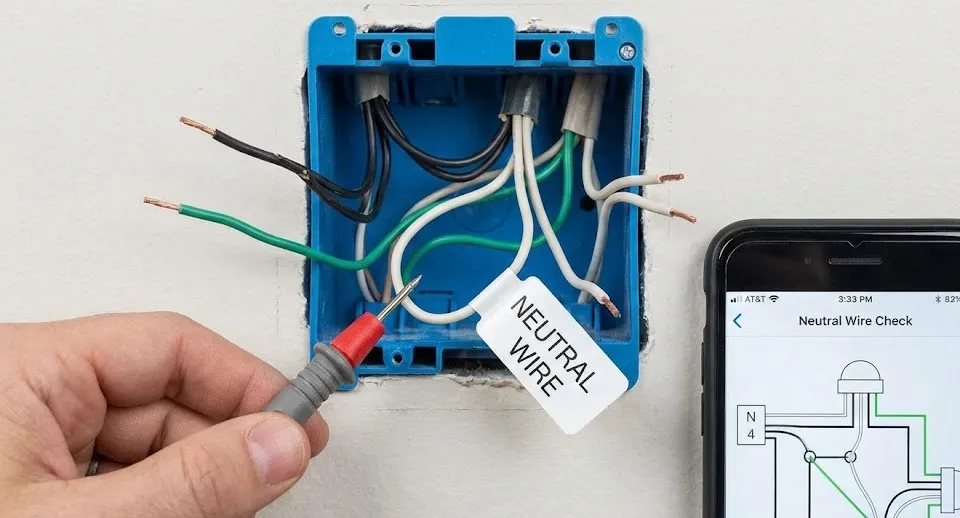
Before we open the toolbox, there is one crucial thing you must check. Most standard light switches only have two wires. However, most smart switches require a third wire called a Neutral Wire (usually white) to stay powered on so they can “listen” for your Wi-Fi signals.
How to check:
- Turn off the power to the switch at your breaker box.
- Unscrew the wall plate of your current switch.
- Look inside the box. Do you see a bundle of white wires tucked in the back? If yes, you are good to go!
- If you don’t see white wires, you will need to buy a specific “No-Neutral Required” smart switch.
Tools You Will Need
You don’t need a heavy-duty tool belt for this. Here are the essentials:
- Non-contact voltage tester: This is non-negotiable for safety. It creates a beep if a wire is still “hot” (live).
- Flathead and Phillips screwdrivers: To remove the plate and the switch.
- Needle-nose pliers: Helpful for bending or gripping wires.
- Wire strippers: In case you need to expose a bit more copper wire.
- Electrical tape: For extra security.
- Your new smart switch: Make sure it fits your specific setup (Single-pole vs. 3-way).
Step 1: Safety First! Cut the Power
This is the most important step in learning how to install a smart light switch. You must cut the power at the source.
Go to your home’s breaker panel (usually in the garage, basement, or utility room). Find the breaker labeled for the room you are working in and flip it to “OFF.”
The Double Check: Head back to the room and try flipping the light switch on and off. The light should not turn on. However, to be 100% safe, take your non-contact voltage tester and hold it near the switch faceplate. If it stays silent, the power is dead. If it beeps, you turned off the wrong breaker. Go back and find the right one!
Step 2: Remove the Old Switch
Now that the power is off, it’s time to remove the old hardware.
- Use your screwdriver to remove the two screws holding the faceplate cover.
- Remove the screws mounting the switch to the wall box.
- Gently pull the switch out of the wall. Do not disconnect the wires just yet!
Take a clear photo of the existing wiring with your phone. This will be your “lifeline” if you get confused later.
Step 3: Identify Your Wires
This is often the part that confuses people, but let’s break it down simply. You will typically see four types of wires:
- Line (Live/Hot): Usually black. This brings power from the breaker box.
- Load: Also usually black (sometimes red). This sends power to the light fixture.
- Neutral: Usually white. As mentioned earlier, these are likely bundled together in the back of the box.
- Ground: Usually bare copper or green. This is for safety.
Note: In your old switch, the Line and Load wires might look identical. Your new smart switch needs to know which is which. If you aren’t sure, you may need to carefully turn the power back on and use your voltage tester to see which wire is “hot” (Line) and which is not (Load). Then turn the power off again immediately.
Step 4: Connect the New Smart Switch
Now comes the main event: how to install a smart light switch by connecting the wires.
Most smart switches come with “pigtail” wires coming out of the back. You will connect these to the wires in your wall using wire nuts (the little plastic caps).
- Connect the Neutral: Take the white wire from your smart switch and connect it to the bundle of white neutral wires in the wall box. You may need to unscrew the existing wire nut, add your new wire to the bunch, and screw the nut back on tight.
- Connect the Line: Connect the black “Line” wire from the smart switch to the “Line” wire coming from your wall (the one bringing power).
- Connect the Load: Connect the “Load” wire from the smart switch to the “Load” wire in the wall (the one going to the light).
- Connect the Ground: Connect the green (or bare copper) wire from the smart switch to the ground wire in the wall.
Pro Tip: Give each connection a gentle tug to make sure the wires are securely held inside the wire nuts. If any copper is exposed outside the nut, wrap it with electrical tape for safety.
Step 5: tuck the Wires and Mount
Smart switches are often bulkier than traditional switches because they hold computer chips and Wi-Fi radios. This can make fitting them back into the wall box a tight squeeze.
Neatly fold the wires in a zigzag pattern and push the switch back into the box. Be careful not to pinch any wires. Screw the smart switch into the box and reattach the faceplate.
Step 6: Power On and Connect to Wi-Fi
Go back to your breaker panel and flip the switch back to “ON.”
If you wired everything correctly, your smart switch should show a small LED light (often blinking green or orange). This means it is receiving power and is ready to pair.
- Download the app recommended by the switch manufacturer (like Kasa, Smart Life, or Tuya).
- Create an account and select “Add Device.”
- Follow the in-app instructions to connect the switch to your Wi-Fi network.
Note: Most smart switches require a 2.4GHz Wi-Fi network. If your router uses 5GHz, you might need to enable the 2.4GHz band on your router settings.
Why Isn’t My Smart Switch Working? (Troubleshooting)
Even if you follow the guide on how to install a smart light switch perfectly, hiccups can happen. Here are common fixes:
- The Switch Won’t Power On: Check the wire nuts. A loose connection on the “Line” or “Neutral” wire is usually the culprit.
- Light Flickers: This might happen if you are using incompatible LED bulbs. Check the switch manufacturer’s manual for compatible bulb types.
- Cannot Connect to Wi-Fi: Ensure your phone is connected to the 2.4GHz network during setup, not the 5GHz one.
Conclusion
Congratulations! You just performed your first smart home upgrade. Learning how to install a smart light switch not only saves you money on electrician fees but also gives you a great sense of accomplishment.
Now, you can set schedules so your porch lights turn on at sunset, or simply tell your voice assistant to “turn off the lights” without leaving your warm bed. Once you install one, be warned: you’re going to want to replace them all!